


I’d like to provide you some relief right now by telling you not to worry so much about your plumbing. It is not as difficult as it seems. You will find that your system is easy to design given it’s size and simplicity as compared to a house and you can forget about soldering copper pipes. With PEX, there’s just no need, and if you can measure and follow basic instructions you can work with PEX!
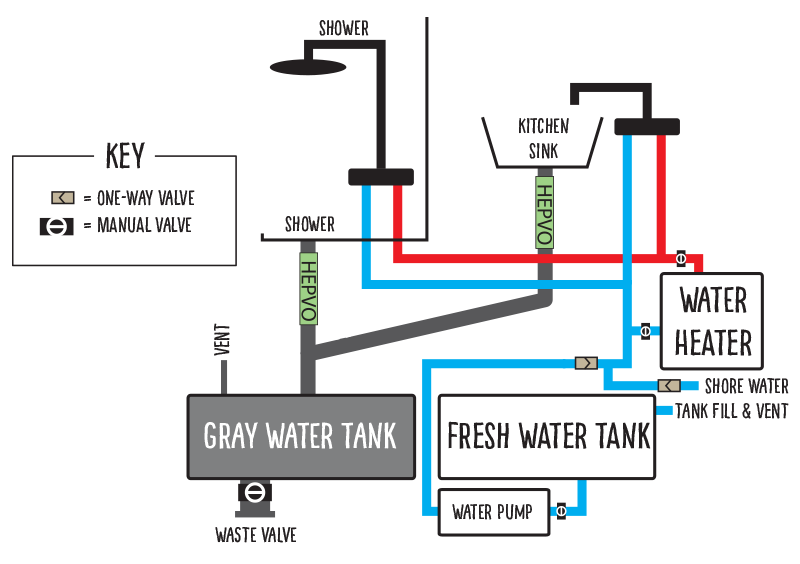
Now the major premise is that you’ve got to get water from municipal water services onto your bus and stored safely for future use. What this means is that the pressure from a garden hose or a dedicated line from a tap will fill a water tank or directly pressurize your water pipes. From there you need it to flow to your fixtures, namely your showerhead and your sink faucets and to do that you need to push it through a vessel (your pipes) with a pump (or with city pressure). From your sink and shower drains you then need to transport it through a vessel (pipes) using gravity to a storage tank where you will then dump it safely and legally into a waste drain.
To do this you’re going to need a fresh water inlet (pick this one for gravity fill only or this one for gravity fill and city water hookup) , a large fresh water tank (my current favorite for a large supply), supply piping (preferably PEX), a 12v water pump, your fixtures and their valves and attachments, your waste piping (perhaps PVC), and a gray or black water tank with a waste valve. While I chose to make all of my plumbing exposed for the sake of modifying or changing it if necessary, and you can certainly make that decision too. But the best place for your plumbing is in the walls of your bus before you install insulation which keeps it neat and tidy and out of the way. You could run it underneath your bus as well IF you never plan to be in a situation where your bus’ pipes will freeze.
To get water onto your bus you will have two options. Option number one is just a water hose and a grey water tank. While it takes a little more labor every week or so to fill our tank this is what we decided to do in our bus. However if you will be parked at length next to a municipal water supply or at an RV park you could actually hook up your bus to city water which will come into the bus pressurized, bypassing your tank and pump, and this will save you the hassle of filling your tank when it’s empty and using a noisy pump to push your water to your fixtures. In the end this decision is about convenience. You can do some upfront work to build this capability into your bus and not have to fill your tank every time it empties, or you can skip this task and fill your tank more often in situations where you may not have to. Either is absolutely fine.
If you’d like to use a pressurized water supply you will add the appropriate inlet on the side of your bus with a threaded attachment for a hose. You will then tap into your cold water supply line at some point after your water pump but before your water heater. Right behind this tee where your municipal water supply comes in you must add a check valve which will prevent your water supply from flowing backward into your pump and tank. Then proceed to plumb the supply to the rest of your bus as described below.
To fill your water tank, or tanks you will install a fresh water inlet in the side of your bus which will allow you to thread a hose or place it in a hole while it dumps water into your tank. As your tank fills with water it will need to displace the air which is inside of it so at or near the top of your tank you will install a (usually 1/2 inch) vinyl tube which attaches to the air escape hole of your fresh water inlet. Now to get the water out of your tank you can attach a braided vinyl tube of the appropriate width to a water outlet on your tank and secure it with a hose clamp (this is also typically 1/2 inch). From there you can add a 1/2 inch barbed ball valve to stop the flow of your water from the tank should you need to troubleshoot or replace your pump someday. From the ball valve the next stop is your 12V water pump. This is the one that I currently recommend and be sure you get it in advance so that you can follow it’s install instructions, but typically to get the water to and from your pump you will use the same 1/2 inch vinyl tubing that you used for your tank connections.
Now from here you have to adapt your vinyl tubing to PEX which depending on what system you use to connect your PEX pipes will require different fittings. To connect PEX there are three options.
Option number 1 is the crimp connection. In this method you will join two pipes using a brass fitting while crimping a copper or stainless steel O ring on either side of the fittings. This is a cheap and easy way to make your connections however you’ll have to buy or borrow a crimp tool to make your connections and you will have to cut away mistakes which depending on how many you make will add to the expense.
Option number 2 are Shark Bite fittings. These fittings are very simple to use and can be applied with just your hands which means you have no up front tool cost. The other major advantage is that they can be removed. For the beginning plumber this is a very nice perk as you may find better ways to orient your pipes and adapt your plumbing to your bus’ changing needs as you plumb. The major downside is that they are incredibly expensive and the cost of fittings will add up quickly.
The third option is to use a PEX expansion tool which spreads the interior of your pipes so that they can temporarily receive a brass fitting before compressing back into shape. Once again your plumbing will not be modular, and you will have to purchase another tool, but your costs may be cheaper depending on how many fittings you need to install.
The good news is that all three of these techniques when done correctly will provide for decades of leak-free plumbing. As always please do a little extra due diligence to establish the best technique for you and your application. If you’re wondering what I did, I bit my tongue and bought a whole mess of expensive Shark Bite push fittings, but I was able to change and adapt my plumbing as I went which helped me save time and materials as a beginner. Be sure to pick up some PVC cutters for nice clean cuts of your PEX tubes. I would choose ½” PEX lines for your supply. Technically ¾” will get you more pressure and flow, but with the low flow fixtures you should be installing in your sinks and showers you may not notice it. The ¾” lines will hold more hot water which will cool and take longer to clear out of your pipes before you can take a shower, however if you’re doing something outlandish like installing a bathtub in your Skoolie you probably want ¾” lines running to it which will fill it much faster. Buy your Pex pipe, and fittings at your local plumbing supply store or Home Depot or Lowes.
Now that you’ve picked your pipes and your fittings and you’ve run some PEX off of the vinyl line attached to your water pump you should install an accumulator tank which is a little pressurized vessel which will assist the pump with water flow and prevent it from cycling so frequently. From the accumulator tank you can start running your cold supply line to your water heater. From there you will install a tee to supply your water heater, and along with the hot water supply line from your water heater you can run PEX lines to your future sinks and shower, and anything else you need hot or cold water for.
Consider in advance how you will run your PEX lines and where you will incorporate them into walls. Attach your hot and cold lines to your shower valve, assuming you are using one, and place quarter turn valves at the end of each sink run. Congratulations your rough plumbing is done!
From here your plumbing will sit until further in the build where you will install your shower trim and shower head, and braided steel lines to supply your sinks.
0 Comments