


When you get your bus home you have a few considerations for parking. For one, you want your bus to be on relatively level ground. Gilligan was never completely level, and that didn’t matter so much when building because I never used a bubble level, however for your sanity, and so that your bus doesn’t sink into the ground you’ll want to get it on a relatively level surface. Our ground was not perfect, in fact it dipped to one side by about 3 inches. So we stacked 2×8’s on the low side and drove onto them which put us close to level. If you do the same be sure to elevate both of your dually wheels so that they are equally supported on whichever side that you are raising.
If you have more time and would like a cleaner look for your parked bus you could dig out and level the ground and bury railroad ties, two for the front wheels and two for the rear wheels. You could also consider having your land prepped and gravel poured to achieve a durable, level bus pad, or you could do the same with pavers or a concrete pad at a much greater expense. In the end if you have firm and level grass you will be able to get away without much prep work as we did. As you park consider that you will have to work underneath the bus, including potentially in this first demolition step so try and avoid parking over a mud-bath.
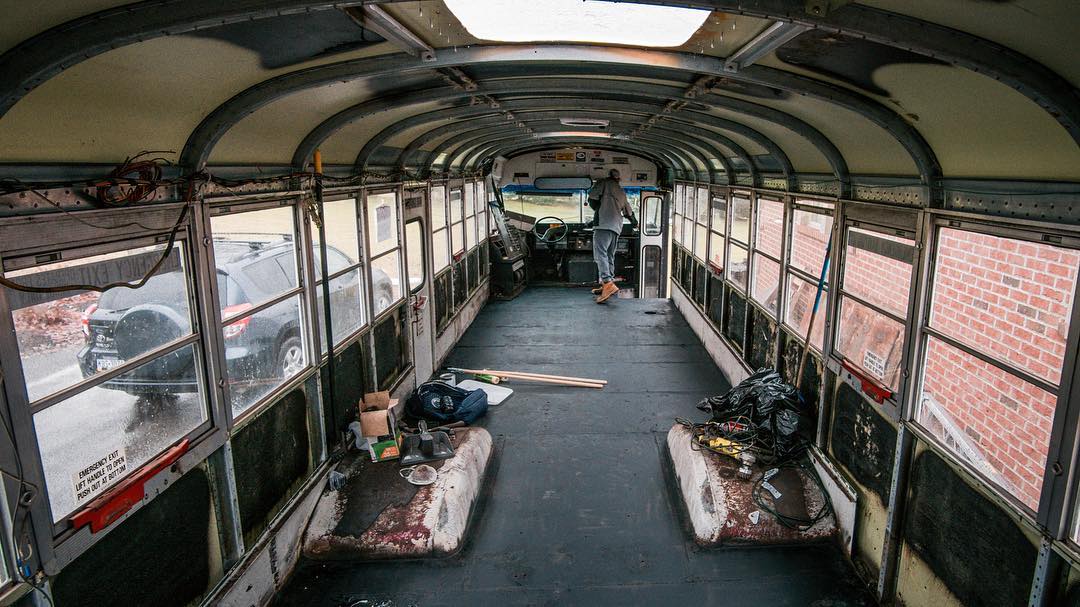
Now that you’re ready for demolition the first step is to get those seats out! For most this is actually a challenging task. The seats are generally bolted through the rubber floor, the plywood subfloor, a steel subfloor, and into nuts. To get them out you will need a standard wrench kit with a ratchet and socket for the top and a fixed combination wrench or another ratchet and socket for the bottom. Now that you own a school bus if you don’t already have suitable tools you may want to invest in a mechanics tool set early (this is the one that I chose). Most bus converters will now discover that many of their bolts and nuts have rusted together, and some may not be easily accessible due to the components under the bus. So if you can grab a partner and unbolt the majority of the seats with ease you’ll be ahead of the game. However if you’ve tried breaker bars and the bolts are not budging it’s time to whip out the angle grinder with a cut off wheel (you will become frenemies with this tool throughout your build: here’s mine). Let me stop you here and mention that the angle grinder is one of the most dangerous tools you will use in your conversion. Their cutting discs can break and go flying. Ideal PPE (personal protective equipment) here is eye and mouth protection, boots, work gloves, long thick pants, and a long sleeve shirt. If you’re working in the 90 degree summer it will be tempting to skip PPE, but don’t.
Now that you have your tools and your PPE, and have gotten all of the easy to remove seats out you can move on to the stubborn ones. Push your bus seats back and forth with force in an attempt to create a gap between your bolt head and the metal foot of your seat. If this helps then cut through the bolt underneath the head. If it doesn’t you may have to cut an X into the head of your bolt and then knock them off with a cold chisel and hammer. Remember you’re doing this because your bolts are rusted, and they may break with force. Feel free to go crazy and have some fun destroying your seats, but try and work smarter rather than harder. A pry bar or crow bar may help. So might a 10 pound sledge hammer if you have one, but this is not a tool I would buy just for the bus build.
After you have all of your seats out I would recommend moving on to removing either your plywood subfloor or your wall and ceiling panels next. I would implore 99 out of 100 bus converters to remove the rubber and plywood in their buses. The reason for this is that over the years moisture has deteriorated your plywood and much of your steel pan may be rusted especially around the wheel wells. You need to remove everything and treat the rust. Pry bars, crow bars, and perhaps a circular saw with your blade set to the depth of the plywood will help you demolish your floor. The main task is to cut away your rubber and pry up your wood in large sections if you can manage it and the screws or nails break off easily, or in smaller sections if large sections prove too difficult. The largest pry bar you can find will really help you out with this task.
I would also implore 98 out of 100 bus converters to remove your wall panels. Your windows have probably been leaking and behind these steel walls you will likely find more rust, and wet mushy insulation if it is made of fiberglass. If you suspect you have rust or moldy insulation behind your walls and ceiling than you must go through the effort to remove them. If you have evidence that your ceiling or walls do not have rust to treat and are insulated with rigid foam board, than perhaps you could decide to leave them in place depending on the type of Skoolie you are creating. In Gilligan Phantom we removed all wall and ceiling panels even though our ceiling was made of plastic, and behind it was rigid foam board in great condition, and no rust. In our walls we did find rust which we treated and painted.
Now how to remove your ceiling and walls may be particular to your bus. Our bus’ interior was put together almost entirely with screws, and backing them all out was a piece of cake. Most bus builders however will likely encounter hundreds of rivets and removing rivets is not always an easy task. The way I removed the rivets that I encountered is I took my drill and a new kit of high quality metal drill bits and I picked the perfect drill bit to almost fit into the divot of our rivets. Then I drilled slowly, applied pressure, and soon the rivet came spinning out of place, leaving me with just the hole that it filled. Repeat until all rivets are gone. Now that you know the perfect drill bit size for your rivets I’d expect to buy a couple more bits of that size before this task is over.
If for some reason this technique doesn’t work for you there is another technique that will absolutely work on all rivets, but it is much more challenging, slightly risky, and will eventually lead to fatigue and that is to grind your rivet heads off with your angle grinder and a grinding wheel (if your angle grinder didn’t come with any I would recommend buying this kit so that you have a couple of options to choose from and some of these wheels may be useful to you later.
If you already own an air compressor you can use an air hammer and chisel to easily and quickly remove all of your rivets. We did our entire build without an air compressor, but there are many times that I wish I had one and if you choose to buy one you will likely find many uses for it, and air tools are generally fairly cheap. With your air chisel simply slide your chisel against your rivet and hammer it out.
Believe it or not other builders have come up with even more ways to remove rivets both easily and with great effort. Feel free to take your time and experiment with this stage. It is tough work to remove hundreds of rivets and it will pay off to discover the tools or techniques that work just right for you and your bus.
With your ceiling and wall panels removed you will now be able to see what sort of state your insulation is in if there ever was any at all. If it is wet and moldy remove it, and expect to find rust behind it. If it is rigid foam board in good shape you may choose to remove it or leave it in place, but do pull it out and check behind it for rust. If you do remove insulation panels to treat rust and plan to put them back when finished then be sure to number them so that you know where they go when you return them.
As you continue with your demolition you will find items and areas that you may need to remove that are particular to your bus. For example you may decide to remove your floor heaters, or the bulkhead cabinet above your drivers seat, or a wheelchair lift or floor tracks. Each item may require a little bit more research, specialized tools, or just more reckless brute strength. I would suggest that you take your time with demolition, be thorough, and complete it in its entirety before moving on to your next task. It will be tempting to leave a complicated or time consuming bit of demolition for later, but you will regret having to bring out those tools and make your bus and yourself dirty if you move on without addressing it during this stage. In your bus conversion you will be well-served by completing tasks to their entirety before moving to the next one.
Photo by our friend Sam Reiser who now Converts Buses and Vans for a Living
0 Comments