


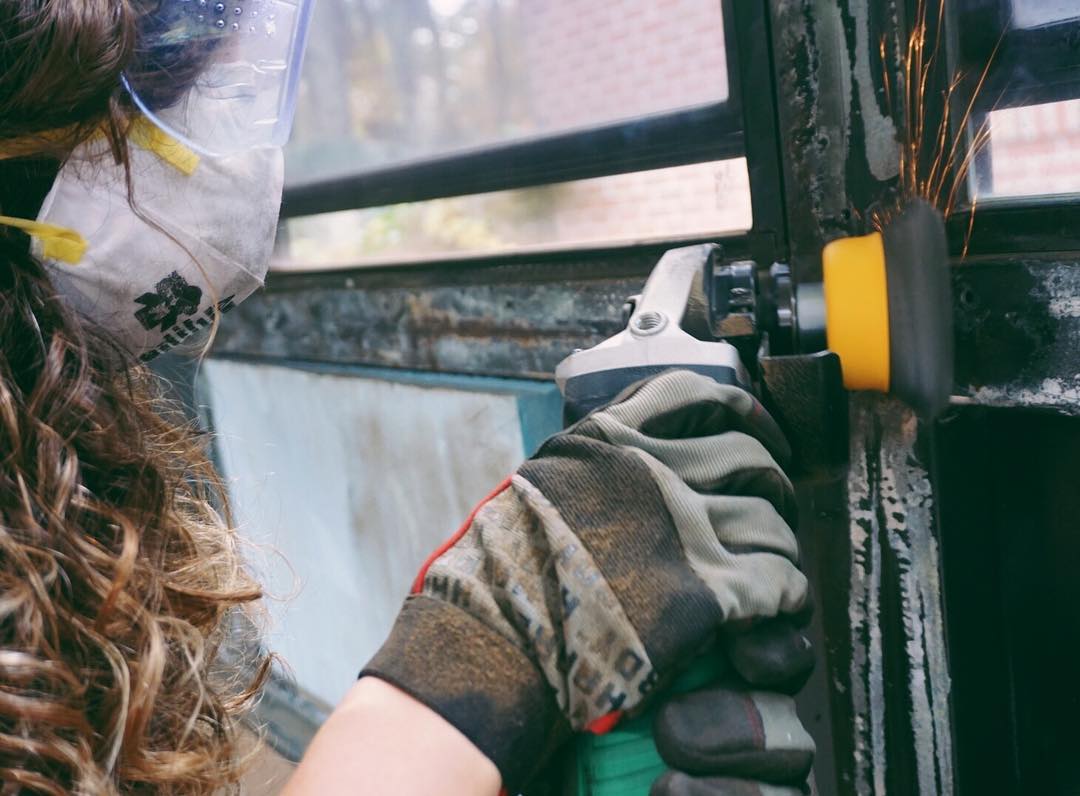
Now that your demolition is complete you will have laid bare all interior metal. Inevitably you will find some rust on your wall panels, and most certainly your floor. If there are actual spots that have rusted entirely through such as around your wheel wells don’t fret these can be replaced. Make note of all rusty areas and get to work grinding them with your angle grinder and brush attachment (such as this one), or this more aggressive one if your steel is solid and can tolerate it). Be sure to wear a respirator, eye protection, and hand protection. The goal here is to remove the bulk of the rust by grinding it away. After a while your surface will go from rusty to sort of shiny and pitted. Don’t get too carried away, but be sure to grind all rust. You may find that this tool when paired with a power drill will allow you to get into joints and cracks that the angle grinder will miss.
With your rust all ground away you can now use a rust converter such as Corroseal or Ospho which chemically neutralizes the rust and readies it for painting. Follow manufacturer instructions and allow the product to work for the allotted time. Be sure to brush or roll it on to all rusty surfaces. With the rust neutralized you can now address any of the metal repairs that you may have to do. Unfortunately if you have spots in your metal floor that have actually rotted through than you would be wise to cut them out and weld in some replacement sheet metal. This task sounds daunting, and full disclosure because our bus has an entirely plywood subfloor this is not something I had to do in our build, but it is actually a simple process and if you chose to tackle it yourself you will be picking up new skills, and self-confidence which is important early in your build. If you have a friend with a welder, who knows what they’re doing feel free to involve them, but be sure they let you have a crack at it as well so that you can learn a thing or two!
Okay first step is to take your grinder and a cutoff wheel and cut well beyond the rotted areas. You’ll want to cut a square or rectangle because it will be easier to cut and easier to patch. Don’t be afraid to cut a bit of solid flooring away. Now take some similar gauge steel (you may find that the wall panels that you removed in the demolition stage will work perfectly) and cut a patch that is larger than your hole. Take your grinder with a wire wheel attachment and use it to clear off the edges of your floor where you will be welding. You want a nice clean surface to weld to. Now you’ll need to pick up a welder and supplies from Home Depot, Harbor Freight, or Amazon (here’s an option that is remarkably cheap, cute, and well reviewed but I don’t personally own it. Be sure to buy and use welding gloves and a welding mask, and now you need to do a bit of research, watch a couple of videos, and maybe run a practice bead or two. You will likely not be good at welding if you haven’t done it before, but the good news is you don’t have to be good at all, you just have to buck up and do it! Weld your patches to the floor, and then seal any small holes that you find with a seam sealer (like this one) or Sikaflex 221 which you will likely use later in your build again. After you’re all done with your patches and your sealant has dried, assess your floor to see if you need to treat any stubborn spots with more rust converter. If not then move on to the next step!
Next up paint the entire floor, and any areas that you have treated for rust with a bare metal or rusty metal primer. You can do two coats if it feels necessary, and you can paint on a top coat as well if you would like, but this step does not have to be pretty at all. You simply want to thoroughly cover any metal that has rusted so that it can’t be exposed to water or air again.
The final step is to cover the nail holes in your floor that popped up after ripping your subfloor away. There are many ways to do this and I wouldn’t fret about it too much. But I will tell you that a polyurethane adhesive sealant may be enough to get the job done if your holes are very small (my favorite is Sikaflex 221 which you will be getting acquainted with soon anyway ), but if your holes are large enough that the adhesive is dripping through them, or if you want more peace of mind from a repair that covers a larger surface area I would use roof flashing cut in to little squares and if by chance you find it’s self-adhering qualities to be inadequate you can use a dab of that polyurethane adhesive when you place the adhesive side down. Good luck and when you’re done move on to the next step!
5 Comments
What are your thoughts about using pennies and adhesive to co we the nail and bolt holes? We are about to be at this step on our bus and fretting over it a bit
It will probably be fine, but I’m not sure if a penny when in contact with sheet steel could cause galvanic corrosion and eventually rust. In general I think it’s not the smartest choice. Some sheet metal cut into squares with the right adhesive is pretty foolproof.
It might be easier to use a hole punch or cutter if you need to make a lot of these, and they end up round.
Copper against steel is 100% guaranteed to produce dissimilar metal corrosion. You’ll end up with a bigger hole.
Thanks for that. Okay pennies is definitely a no-no, except they’re rarely actually really copper are they!