


In order to insulate your walls and ceiling and create a thermal break between the metal frame of the bus and the wooden interior you will need to add furring strips. For your furring strips you will have several material options depending on the depth you plan to fur out your walls and ceiling but in general you will either be buying long boards or ripping sheets of plywood. A common furring option if you just plan to fur out by ¾” is a 1”x3” or a 1”x4”. However you might want to consider furring out 1½” in which case a 2”x3” or 2”x4” makes sense but also two 1”x3” or 1”x4” stacked would be fine as well and would make for a slightly better thermal break. A third option is ripping sheets of ¾” plywood and stacking them to whatever depth you desire which is what we did however we only did this because we planned to have our interior finished edge be an exposed stacked plywood edge. It is not necessarily more cost efficient once you add the time it takes to cut it down to size.
Once you’ve picked your material you now have to decide what orientation you plan to install your furring strips in. The first option is to screw them adjacent to the vertical supports in the walls and the horizontal supports in the ceiling. This will actually create some level of a thermal break but it will not decrease the amount of interior space in your bus or decrease your ceiling height and you still may have issues with your interior walls touching your metal frame. For the ceiling this may be the right choice for some who cannot afford to lose any more interior height.
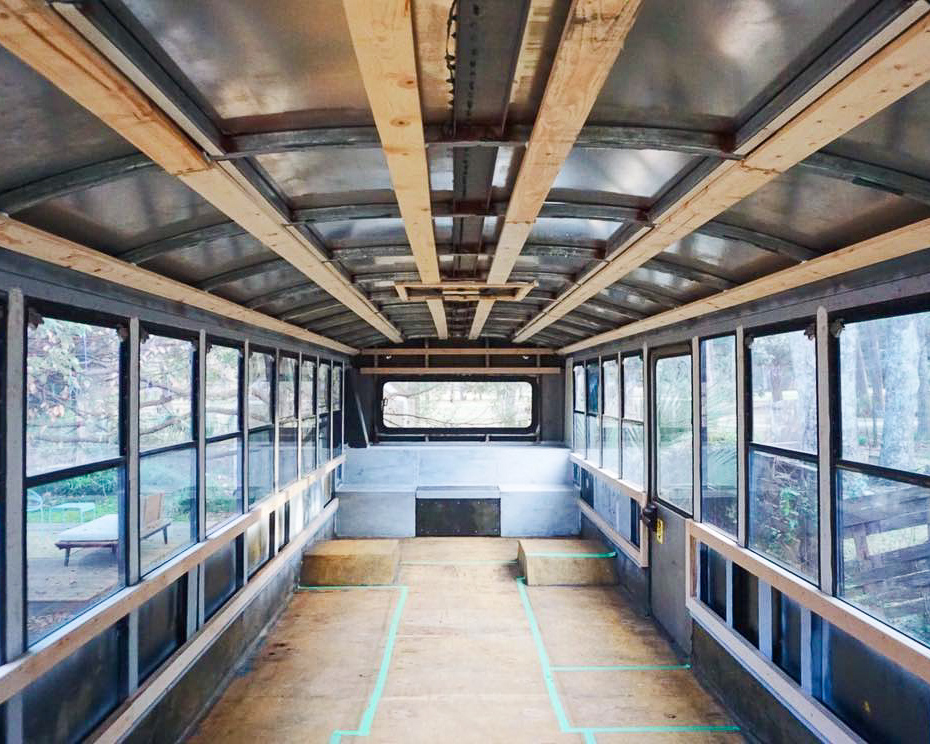
The next option is to also install your furring strips vertically directly on the steel frame which will get you deeper insulation depending on how far you fur out. This creates the same amount of a thermal break as the first option but with the wood furring touching the metal frame over the majority of its surface area there is still significant thermal transfer. What you want ideally is the maximum amount of metal surfaces covered with insulation which conducts hot and cold much less than wood which brings us to option number three.
The final option is to attach your wooden furring strips perpendicular to the metal framing. This results in the least amount of metal contacting your wood which leads to the most thermal conductivity mitigation. The result is that your Skoolie will now look like the inside of a wooden ship while it’s being constructed.
Now that you have decided on the orientation of your furring strips and the materials the only decision left is how many to install. We ended up doing three on the walls and 6 on the ceiling. I can tell you from experience that more is better and having several more furring strips on the ceiling to attach our finished plywood to as well as to screw our plywood walls or wall framing to would have made for a better finished product. I would aim for around 9 furring strips in the ceiling if I were to do it again.
The final task is to actually install the furring strips and to do this you will need self-tapping wood to metal screws and you will need a whole lot of them. I recommend the Teks 1 7/16” wood to metal screw if you are using ¾” inch lumber, and the 2 ¾” wood to metal screw if you are using 1 ½” lumber. If you are doing multiple layers of ¾” then it is best to attach the first board with the wood to metal screw and the second board to the first with a wood to wood screw. In my experience there is no need to pre-drill any holes in the wood unless they are at the very edge of a board where two boards meet. Once again consider using adhesive behind your screws and there are even some adhesives that will contribute to a thermal break, but this is a step that we chose to skip.
Good luck and get to work!
0 Comments